
Facebook Ads Reporting: How to Plan, Manage and Track Campaigns
Marketing managers can create, personalize, and schedule reports on the Facebook ads performance using Facebook Ads Reporting. This is a complete guide on how to create an automatic Facebook Ads Reporting tool for your business.

As Facebook Ads are getting better, it is getting more competitive for marketers. 93% of social media marketers use paid Facebook ads and 64% of social media marketers plan on increasing their Facebook ad activities in 2022. If you want to attract the right audience, you need to make your Facebook advertising game much stronger and a Facebook Ads Reporting tool can help you with it.
Advertising on Facebook has a plethora of benefits. Facebook not only provides better ad types than any other social media platform. It also helps you micro-target your exact audience. This means you can target an audience based on gender, age, location, spoken language, education, job title, and much more.
With Stackby, you can create a custom Facebook Ads manager reporting dashboard that suffices your business goals and requirements. In this post, we are sharing a 5-step process to plan, manage and track your Facebook Ads Campaigns using our free-to-use Facebook Ads Reporting Template. Let’s get started.
Step 1: Plan your Facebook Ads Campaigns
If you are just starting with Facebook Ads Reporting, the first step is planning your Facebook Ads Campaign. The Facebook Campaign follows a hierarchical structure often referred to as ‘levels’:

1. Level 1: Campaigns
The first level in the hierarchy is the Facebook ad campaign. A Facebook ad campaign helps you organize your ad creatives, bid strategy, target audience, objectives. You can define different Ad Campaigns based on different objectives such as brand awareness, traffic, conversions, lead generation, etc.
2. Level 2: Ad sets
The next level in the campaign hierarchy is an ad set. An ad set defines your target audience, budget, bid settings (which can be manually set or optimized through programmatic advertising techniques), ad placements, and other related settings based on the campaign objectives. For example, if your campaign is for three interest-based audiences in four different locations, then you will be creating 12 different ad sets for them. An important thing to note here is that you can set your budget on the ad set level depending upon your target audience.
3. Level 3: Ads
The last level in the hierarchy is an ad. A Facebook ad is the actual creative message that you want to send across your audience. Facebook provides different types of ads such as image ads, video ads, slideshow ads, carousel ads, collection ads, instant experience ads, and lead ads.
With Stackby, you can plan, organize and monitor all your Facebook Ad Campaigns in one place. To get started, you can use our free-to-use Facebook Ads Campaign Template and this takes us to our next step in Facebook Ads manager Reporting.

Read more: Your Complete Beginners Guide to Managing Facebook Ad Campaigns
Step 2: Automate your Facebook Ads Campaign Reporting
If you are considering creating the Facebook ads reporting template in excel, it is time to switch to an automated, database-like platform such as Stackby. Our Facebook Ads Campaign Template allows you to manage & track your Facebook Campaigns, Ad Sets, and Ads all in one place. Let us see how you can customize and automate the Facebook ads campaign reporting template for your business.
How to integrate Facebook into Stackby Workspace?
- Go to integrations and select Facebook Ads.
- Click Add key and enter a name for the integration.
- Select your concerned Facebook account and bring the API key automatically.

Integrating Facebook Ads and Stackby
How to bring a Facebook Ad set or Ad ID to Stack Table?
- Open Facebook Ads Manager account.
- Click the Columns dropdown menu and choose Customize Columns.

- Go to the Settings header, select Object Names & IDs.
- Click to check the boxes next to Campaign ID, Ad Set ID, or Ad ID.
- Select Apply and you will be able to see the campaign, ad set, or ad ID in the Ads Manager table.

Find Campaign ID, Ad Set ID, or Ad ID from Facebook Ads Manager
How to bring Campaign, Ad set, or Ad IDs to your Table?

With Stackby’s API Connection Column, you can easily connect your workspace to your Facebook Ads Account. This way you can bring all your Facebook ads metrics like CPC, CPM, Clicks, and even complete account summaries like Spend, CPC, CPM to your tables using Facebook Ads Reporting API.
- Once you have the required campaign, ad set, or ad ID, bring them to your table.
- Then create a new column of type API or Service.
- Select an API from your account, that is Facebook Ads API.
- Select a Facebook Ad service. For instance, details of a particular account, details of a particular ad, details of a particular account by ad set, etc.
- Select the reference column. For instance, Campaign ID, Ad set ID, or Ad ID and click apply.
- This will bring all the required information in the new column.
Steps to bring all the required Statistics related to your Facebook Campaigns, Adsets, or Ads to your table:
Step 1: To see the complete data, click on the {data} icon. It will show all the corresponding data based on the Facebook Ad service you have selected. For example, if you have selected Campaign details you will get the information about:
- Number of clicks
- Impressions
- Spendings
- Number of comments
- Number of likes
- Link clicks
- Posts,
- CPC (Cost per Click),
- CPM (Cost per 1000 impressions),
- CTR (Click through Rate), etc.
Step 2: Just click on the data items that you need in your Facebook Ads Reporting tool and it will create separate columns for them.

Step 3: Track your ROI
The next step in your Facebook Ads Reporting is to add leads and track the ROI for the campaigns. For every Campaign, Ad set, or Ad ID that you are tracking, add the corresponding leads that you have generated.
You can bring Facebook Lead Ads data to your Stack automatically using workflow automation platform Zapier. This means, whenever a new lead is added to Facebook Lead Ads a new row will be created in the Stack table. Let us see how.
- Create a Zapier account and connect it with Stackby. Here’s how you can do it: Log in to your Zapier Account -> Navigate to My Apps -> Create a New Account -> Search Stackby -> Connect Zapier to Stackby
- Create a Zapier automation using the required Trigger and Action. A trigger is an event that starts the automation process. In this case, our trigger is “New Lead”. Action is the event that happens when a trigger occurs. In this case, our action is “Create a new row”.
- Select the data that you need to send from Facebook Leads Ads to Stackby via Zapier. In this case, you will have to add your Stackby account to Zapier and select the Workspace, Slack, Table, and View. Similarly, you also have to link your Facebook account to Zapier.

Read more:
- 4 New Security & Permission Features To Take Your Stackby Workflows To The Next Level
- (How to) Build your Custom Google Ads Reporting Tool For Your Brand or Clients
- How To Create A Custom SEO Tracker Using Stackby?
- Connect Stackby to 2000+ Apps and Websites
- Introducing Stackby Powerups
Steps to track the ROI for Facebook Ads Performance Report:
The measurement of ROI (Return on Investment) becomes much easier if you have all the required statistics with you. To calculate the ROI, you need to compare two numbers: how much money was spent and how much money was gained.
Use the following formula to calculate ROI: (Money Received – Money Spent)/Money Spent
For example, if you spent $1500 on Facebook Ads in the past 30 days and generated sales of $5000, then the ROI percentage formula will be (5000-1500)/1500 = 233.3 percent.
Stackby provides a column type for Formulas where you can compute numerical operations, logical operations, functions, and text operations. You can use two or more column types to calculate the formula.
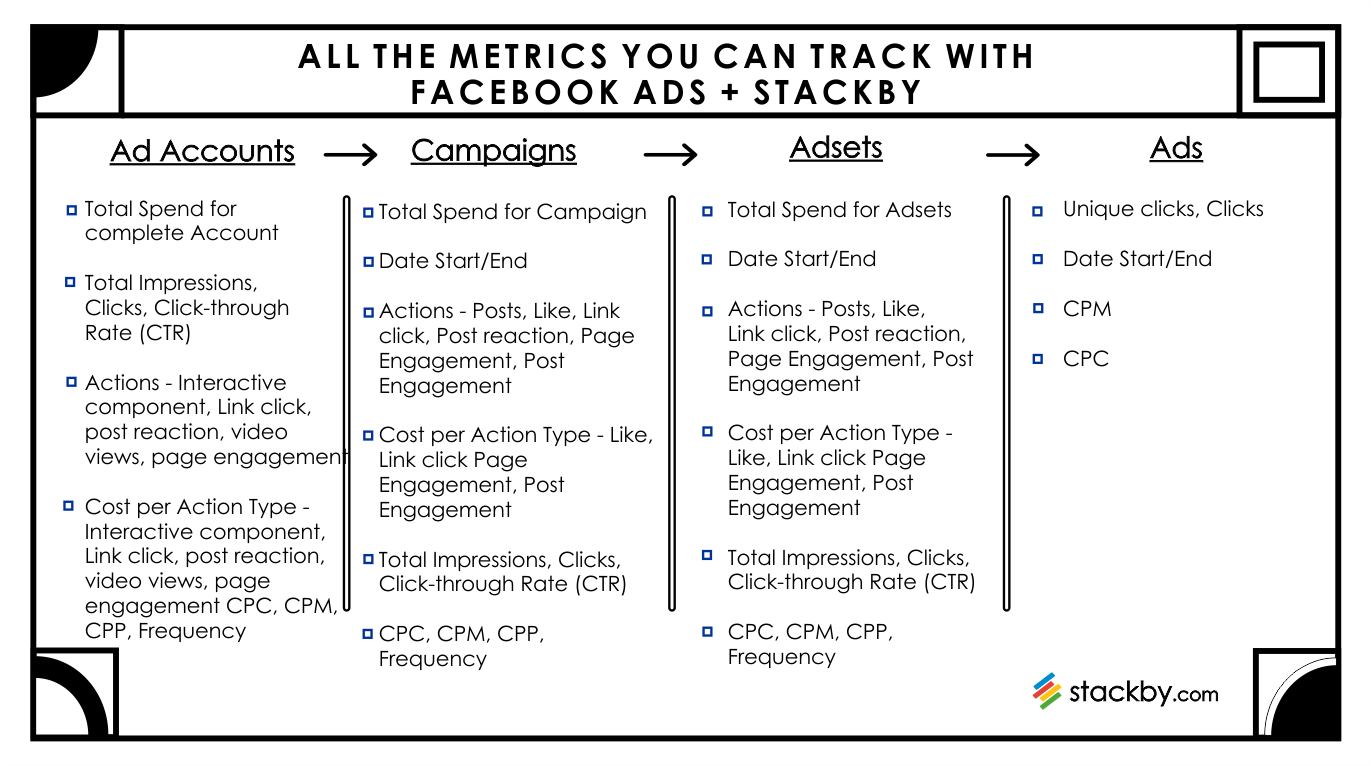
Step 4: All your key Ads KPIs in a single place
Your Facebook Ads manager Reporting tool now has all the required data and important KPIs. Everything can be accessed in one place, thereby avoiding any mismatch, confusion, or delay in the workflow.
- You have all the Campaign details such as Campaign Goals, Campaign Leads, Ads, Ad sets, CPM, CPC, Date Started, CTR, Money Spent, Clicks, Impressions, etc.

- You have all the Ad set details such as Campaigns, Ads, Budget, Total Ads, Location, Age, Audiences, Start Date, CPM, Impressions, CPC, Spending, Clicks, etc.

- You have all the Ads details such as Ad Assets, CPM, Unique Clicks, Text, Leads, Status, CPC, Date Started, Date Stopped, Clicks, etc.

- You have your Facebook Ads account data such as CPC, Spendings, CTR, CPM, Clicks, Impressions, and IDs.

Steps to set up time-triggered automation for fetching data from your Facebook Accounts to your Stack:
- Go to the API connector column in your table. You will see a small clock icon over it.
- Click on the clock icon and a pop-up will appear.
- Click on Create Automation.
- Set the day and time of the automation. For instance, every 3 days at 16:00.
- Click schedule and the data will be refreshed as per your automation.

Step 5: Share with your Clients or Internal teams
The last step of creating a free Facebook Ads Reporting tool using Stackby is collaborating and connecting with your team/ clients. Now, you can invite all your team members or clients to collaborate with you on the Facebook Ads Reporting tool in real-time.
- There could be a possibility that different team members are working on different ad campaigns. Now, all of them can report their progress on one platform.
- You can share your Facebook Ads Campaigns results with your clients and ensure a transparent workflow.
- All your team members can keep a track of different campaign statuses, budgets, and ROI.
- You can work together with your team to improve the quality of your ads that help you meet your campaign objectives.
Stackby offers different security and permission features that enable teams to share Stacks and Views as per their requirements.
- With our view level sharing feature, you can share a particular view of your Facebook Ads Reporting tool with your team.
- You can also restrict Stack or Views by Domain name. This feature can particularly be useful when you want to share your Stack with a client.
- You can also password-protect your Facebook Ads Reporting Stack and ensure only authorized people can access it.
Start Tracking Your Facebook Ads Campaigns now with Stackby
The native Facebook Ads dashboard is often overwhelmed with data which makes data reporting a complicated process. With Stackby, you can streamline your Facebook ads campaign management & create facebook ads performance reports and focus on the information that you actually need. You can visualize all your ad campaigns in one place, making it easier for your team to see the big picture. Sign up for free with Stackby right away to plan, manage and track your Facebook ad campaigns automatically.
Here’s a step by step video for you on how to manage your Facebook Ads using Stackby:
Frequently Asked Questions
1. What’s included in Facebook Ads Performance Report?
Facebook ads performance is generally measured using metrics like display, CTR, clicks, impressions, total action value, action rate %, and spend. You can measure the metrics as compared to a previous period and see how well your ads are performing.
2. What is a Facebook Ads reporting tool?
The Facebook Ads reporting tool allows you to bring all the important KPIs to one place and makes it easier for you to track and manage them. It helps you automate the manual process of adding data into the reports and brings data automatically to generate reports in real-time.
3. Why is Facebook ads reporting important?
Facebook ads reporting helps you understand how many people saw your ads and how many people interacted with them. This helps you determine how many people are you reaching with your ads and what’s working for them that makes them click the ad to know more about your business. Facebook ads reporting is important for decision-making.
![Best 14 HR Database Software for Recruitment Agency [Free+Paid] [2026]](/blog/content/images/size/w960/2024/04/stackby--hr-database-software-blog-post-5.3.jpg)
![A Simple Guide on Workflow Management Software [Updated 2026]](/blog/content/images/size/w960/2021/12/work-management-blog.png)
![Step by Step Guide on How to Build Forms in a Database [2026]](/blog/content/images/2022/03/form-database-blog.png)