(How to) Build your Custom Google Ads Reporting Tool For Your Brand or Clients
Tracking Google Ads Campaigns for your brand or your client's? Learn an easy way to create a Google Ads Reporting tool in just 5 minutes.
Google Ads is a powerful tool in the online marketing world with more than 7,000,000 advertisers using Google Ads PPC. While Search Engine Optimization (SEO) takes a bit of time to do its magic, paid advertisements can provide results much faster. Especially, for companies that currently have no online presence, paid advertisements can lead to quick traffic and also conversions. It has been seen that two in five small-to-midsize businesses are running a PPC campaign which is why Google Ads Reporting has become quite a necessity.
Top 8 Free & Paid Google Analytics Reporting Tools 2024
If you are just starting out with Google Ads or whether you have run Google Ad campaigns in the past, tracking ads can always be a daunting adventure. But, what if Stackby can change your Ad Campaign game forever?
Today, we are sharing a simple 5-step guide to build a custom Google Ads Reporting Tool that can help in tracking all your Google Ad campaigns for your company or your clients (if you’re an agency) in one place. With this tool, you can plan your Google Ads Campaigns, bring Adwords data to Stackby, track your conversions, share your views with your clients or internal teams, and keep track of all your Google Ads Reports in real-time.
Let’s get started with 5 easy steps:
Automate your PPC Reporting using Stackby
Bring all your Ads KPIs in one place
Share reports with your Client's and Internal Teams
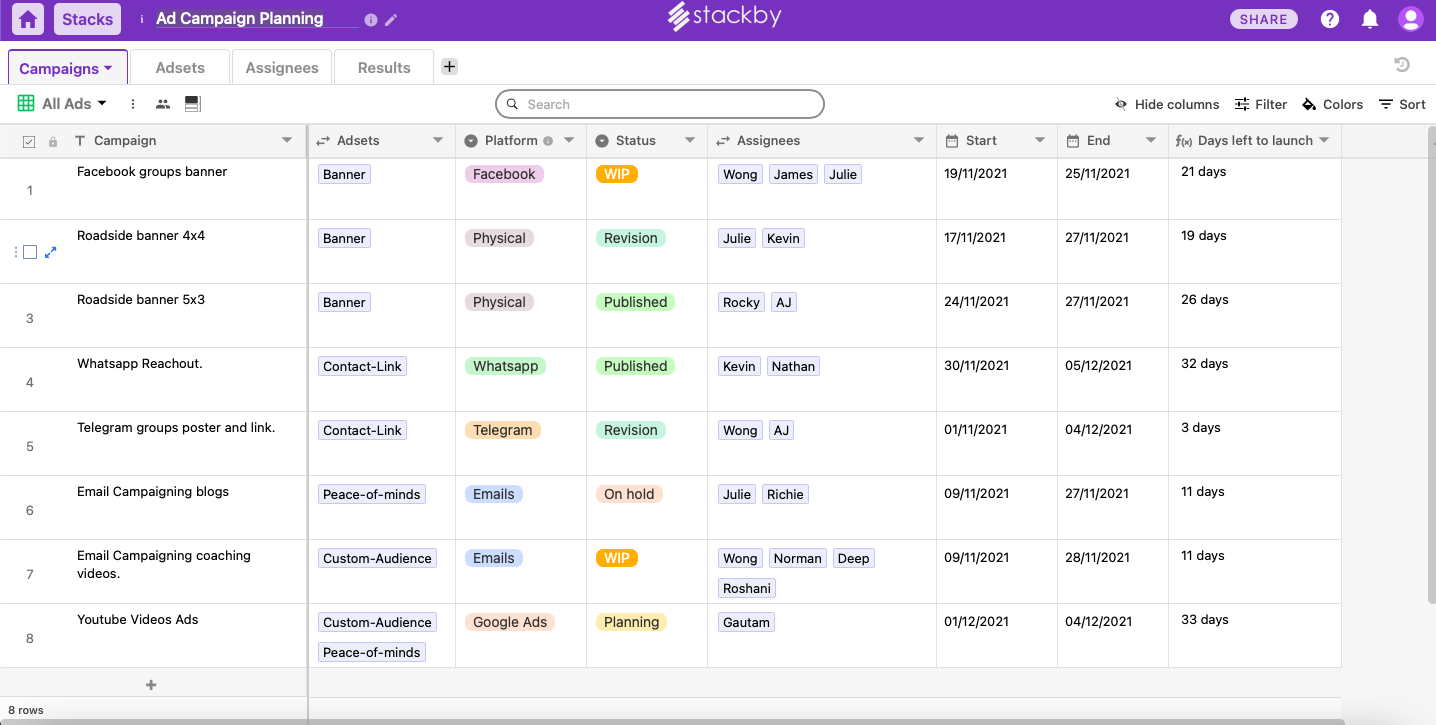
Step 1: Plan your Ad Campaigns
Google Ad Campaign is a system for advertising in the Google search engine results pages (SERPs). To help you streamline your Google Ads Campaign management and planning, Stackby provides a pre-built Ad Campaign Planning Template. With this template, you can record the details of all the ad campaigns run by your company, appoint an assignee to each Ad Campaign, store the details of the assignee, keep a check on the total number of campaigns running, and much more!
Here we are sharing a few simple tips on planning a Google Ad Campaign using our pre-built Ad Campaign Planning Template:
- As a prerequisite to creating your Ad Campaign, you must first sign up and create a Google Ads account. You must also decide the goals of your Ad Campaign. For example, you might want more people to enrol in your online course or you might want people to visit your store. Having a goal is important as it will help you at every step of creating your Google Ad Campaign.
- Now, go to our Ad Campaign Planning template and start adding data as per your requirements. First, you need to decide the number of Ad Campaigns you want to run and the platforms over which you want to run your ads. For instance, Facebook, WhatsApp, Google Ads, Email Campaigning Blogs and so on.
- For each ad campaign, you need to decide on the Adsets. Adsets are assets like banners, images, videos etc.
- Now for each of your ad campaigns, you can assign the assignees who will be taking care of the execution of the campaign. You can further keep their information in a separate table. For instance, their designation, email, phone number, and the number of ad campaigns they are responsible for.
- You can also record the start and end dates of the campaigns and the number of days left to launch each campaign. We have also mentioned a column to track the status of every campaign. For instance, WIP (work in progress), published, revision, planning, etc.
- Our template also includes a results table where you can track the important metrics of every campaign such as spending, impressions, CPM, number of clicks, cost per click, conversion rate, and so on. This can be automated using the steps below.
Learn more: How to perfect your PPC Campaign Management
Step 2: Automate PPC Reporting using Stackby
The next step is to connect Stackby to your Google Analytics account and bring in your Google Adwords data. To do this, go to your Stackby account -> Click Integrations -> Find Google Analytics -> Click Integrate. It will require your API key.
Once you have linked Google Analytics to Stackby, you can then follow the steps below: Let us see how to do it.
- Create a Stack by copying our pre-built Google Adwords Reporting Template. The template already includes the data structure to track your Google Ad Campaigns.
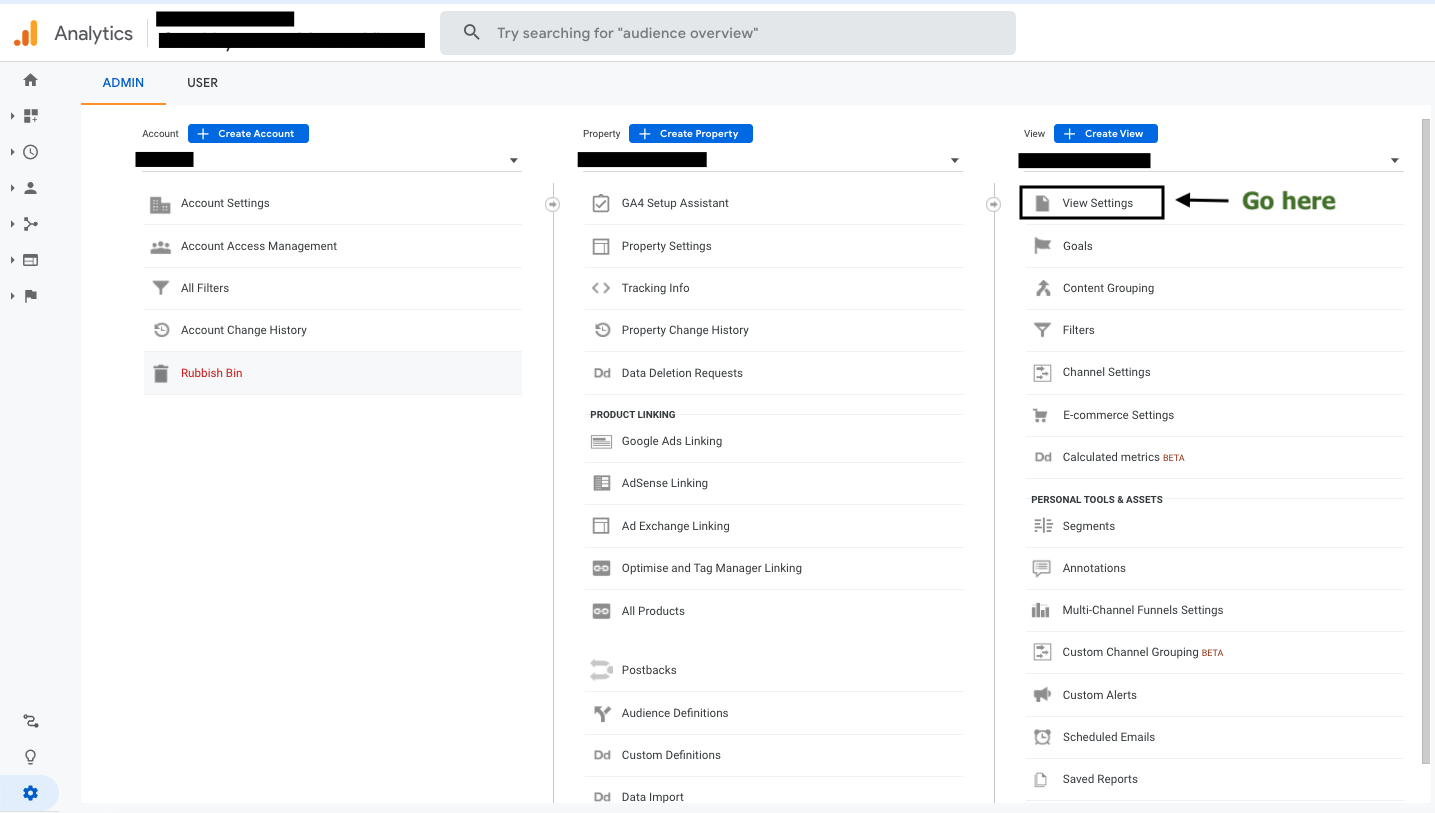
- If you are not using our pre-built template then, go to Google Analytics → Admin → Account → Property → Select your View and then copy your View ID from the Google Analytics account and paste it in the primary column of the Stack that you have created. You can also mention the start date and end date of the campaign.

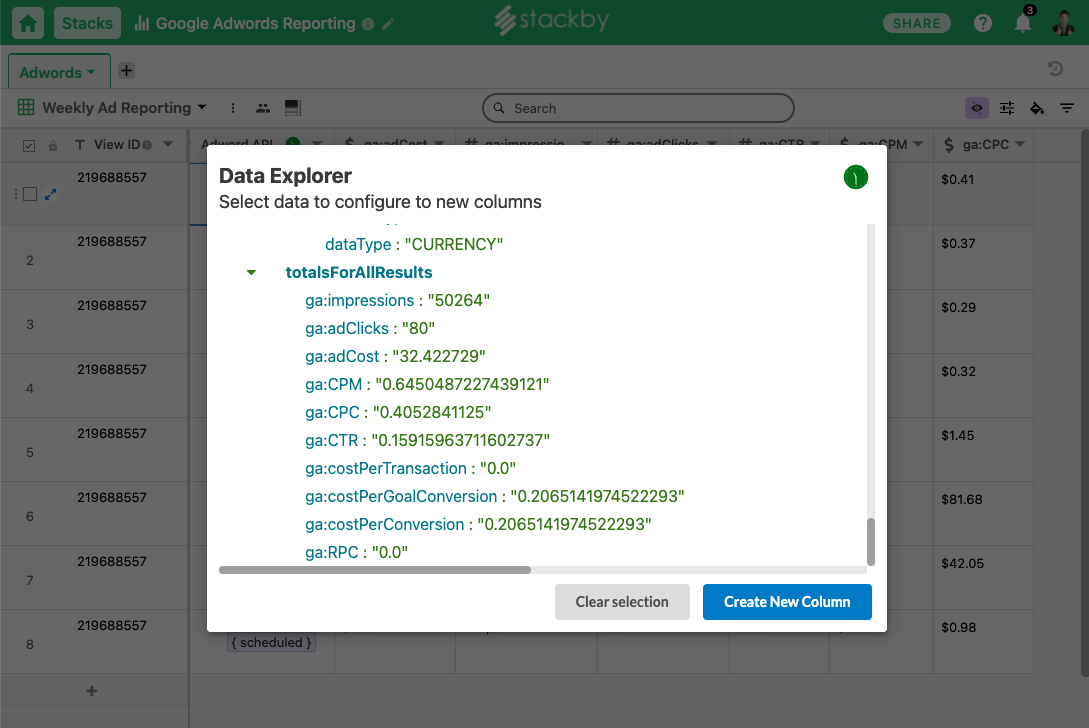
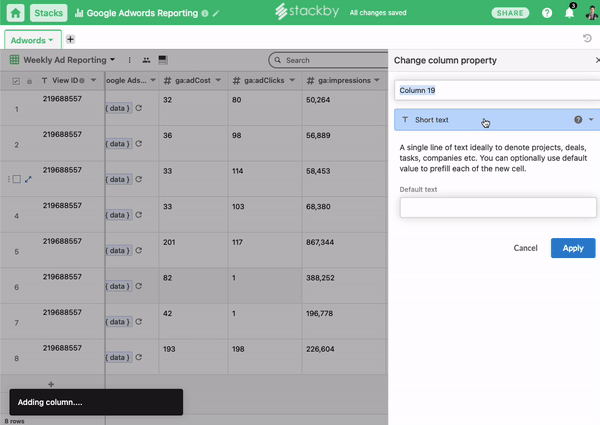
3. Now, we need to bring the corresponding data for the View ID from your Google Analytics account to your Stack. To do that create a new column and connect it to an API or service. Choose Google Analytics Account as the 3rd party service provider. Note: Google Adwords data is available via Google Analytics API.
4. Enter the API key and select the API function. In this case, we will choose “Get Google AdWords Data by View ID”.
5. Then, select the View ID column as a reference column. Add Start date and End date as references and click Apply.

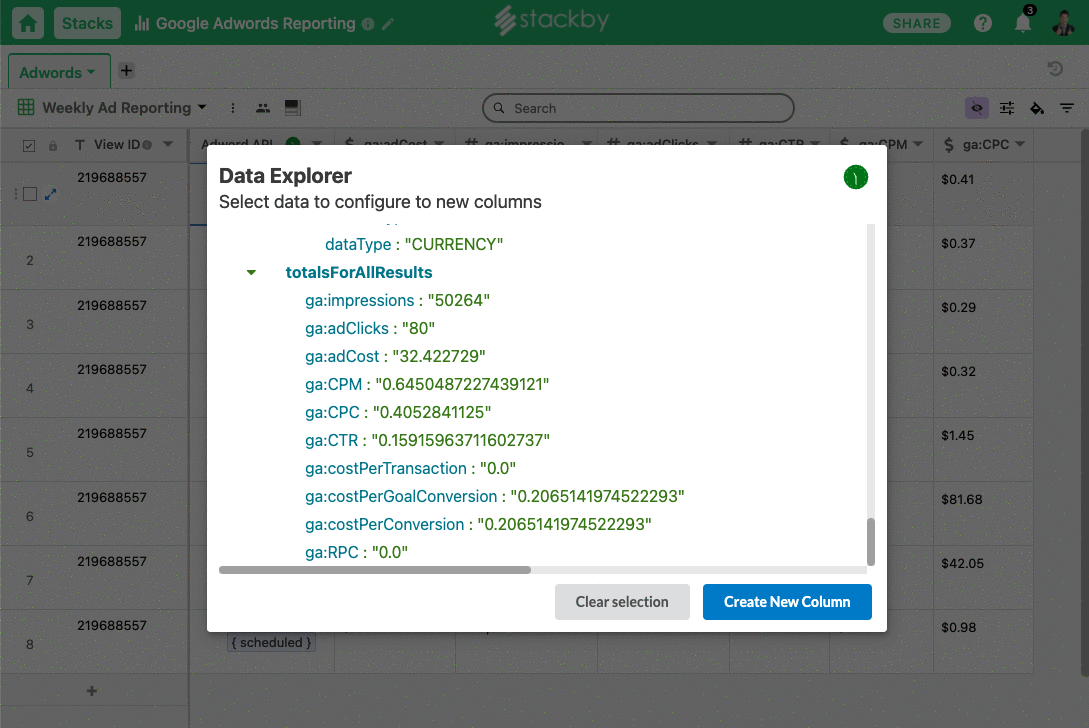
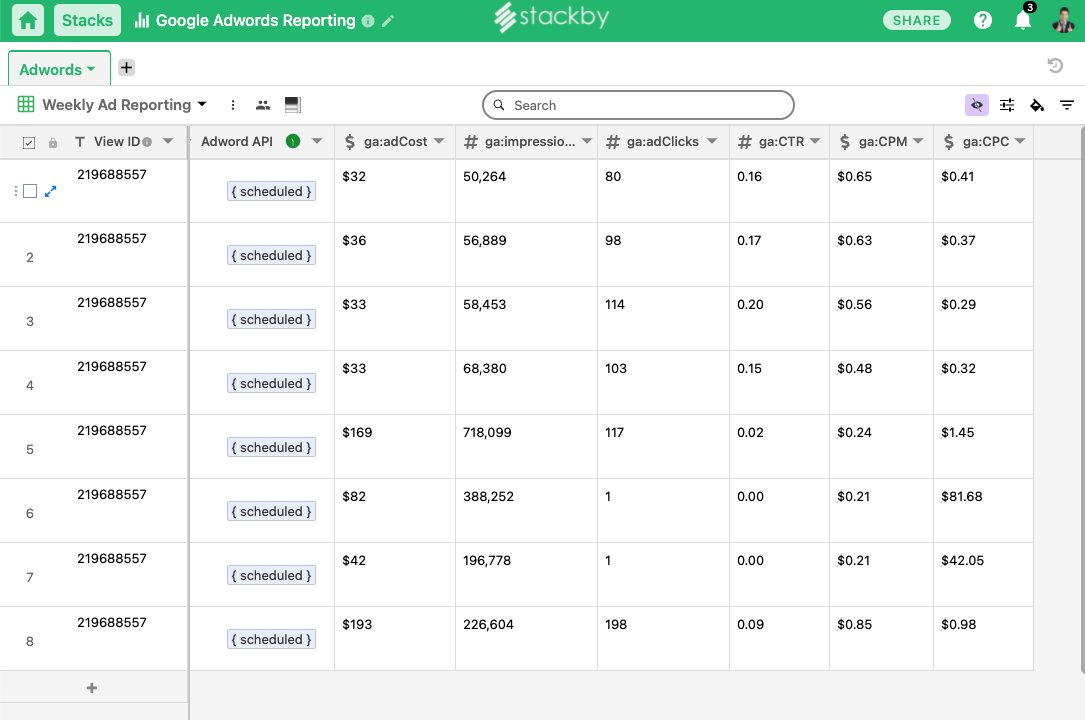
This will pull all the data from your Google AdWords account and place it corresponding to every View ID. To view the data, just click on the corresponding cell and it will show all the information like:
- CPC: Cost per Click
- CTR: Click-Through Rate
- CPM: cost-per-thousand-impressions
- RPC: Revenue-per-click
- Ad Cost
- Impressions
- Ad Clicks
- Cost per conversion and so on.
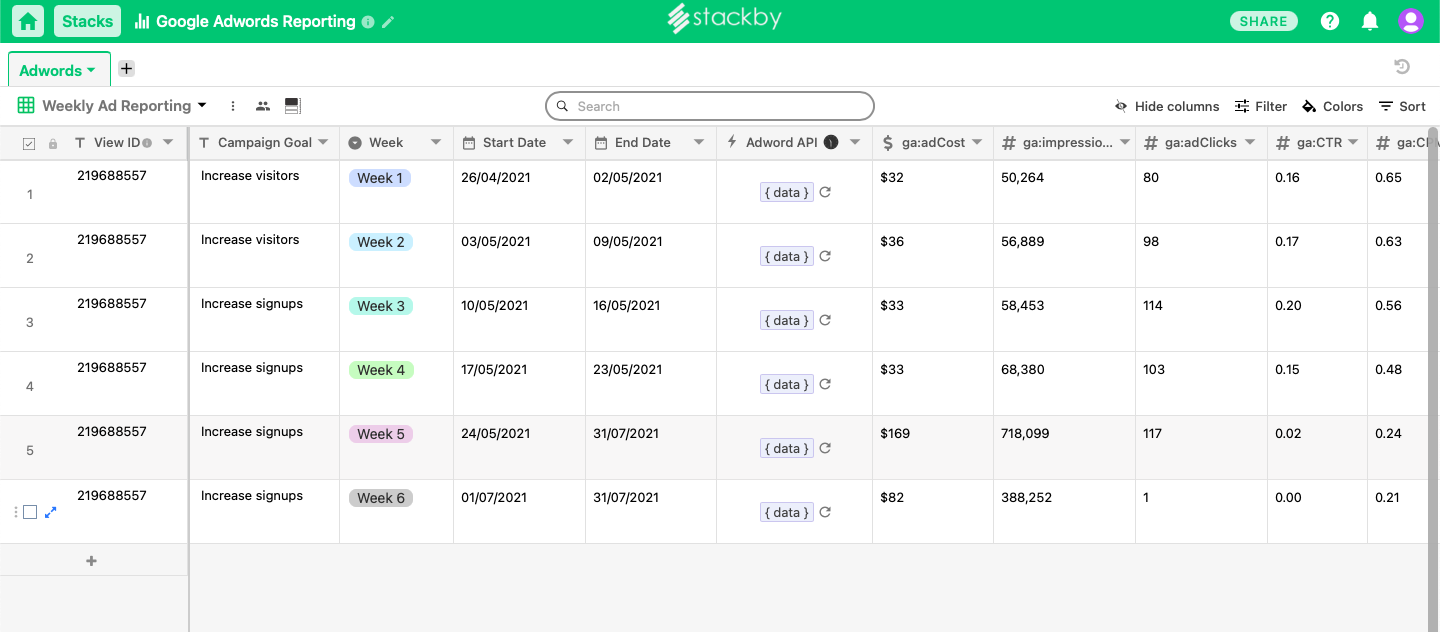
Now, you can anytime view the latest information corresponding to different Ad Campaigns which takes us to our next step that is tracking conversions.
Learn more: Ultimate guide to managing Facebook Ad Campaigns
Step 3: Track Goal Conversions
Every website has certain goals for instance increase in purchases, increase in visitors, increase in sign-ups, etc. All these goals can be set up and monitored in Google Analytics. Then, you can use your Google Ads reporting tool to identify the goals that are completed or converted. For example, whether a customer made a purchase, whether there is an increase in the number of visitors and so on.
Use Free: spreadsheet for business expenses [2023]
Tracking the conversion rates of your goals can help you understand how your website is doing, what is going well and what is not. You can track each of your business goals with Stackby by using Google Analytics API. Just create a new column in your Google Ads Reporting Stack. Connect it to Google Analytics API and select the analytics service you want to monitor.
Also check how you can create your Custom Google Analytics Reporting Dashboard:
Step 4: Bring all your Ads KPIs in One Place
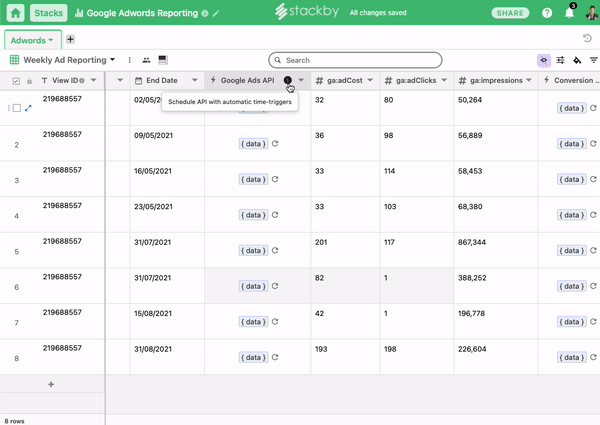
Creating a custom Google Ads Reporting tool allows you to bring all your important Ads KPIs in one place. This way you can check all key PPC metrics like impressions, clicks, conversion rate, cost and much more in real-time. To refresh the data for a particular ad campaign, all you need to do is click on the refresh icon in the Adword API column.
But what if you do not want to refresh data again and again? What if you want to automate the process? Well, Stackby has the solution!
Just go to your API connector column which is Adword API in our case. You will see a small clock icon over it. Just click on the clock icon and a pop-up will appear. The pop-up will ask you to create an automation. Click on it. Then, set the day and time of the automation. For instance, every 3 days at 16:00. Click schedule and the data will be refreshed as per your automation.
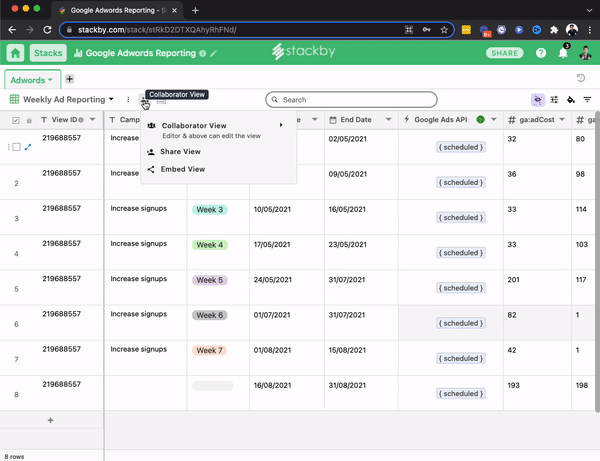
Step 5: Share with your Clients or Internal Teams
Congratulations! You have successfully created a custom Google AdWords Reporting Tool for your brand or your client! This tool will track all your Google Adwords data and Google Analytics data automatically. Now, the last step is to share your tool with your team or client so that they can keep track of their Google Ads Campaigns in real-time. Sharing a stack is easy. Just go to the top-right corner of the stack and click share. You can enter their email address or share the link of the Stack to share it with them.
Google Sheets Vs Excel: Which is better for you? [2023]
Check out the following video on how to automate Google Ads Reporting step by step:
Wrapping up
Creating a custom Google Ads Reporting tool with Stackby can help keep track of all your ad campaigns in one place. The process is quite simple. Start with planning your ad campaign. Include goals, budget and advertisements. Connect Stackby to your Google Analytics account and bring in all your Google Adwords and Google Analytics data. Track all your important Ads KPIs in one place and share your Google Adwords reporting tool with your clients and team in real-time. Sign up for Stackby today and build your custom Google Ads campaign tracker in less than 5 minutes.
![Best 14 HR Database Software for Recruitment Agency [Free+Paid] [2026]](/blog/content/images/size/w960/2024/04/stackby--hr-database-software-blog-post-5.3.jpg)
![A Simple Guide on Workflow Management Software [Updated 2026]](/blog/content/images/size/w960/2021/12/work-management-blog.png)
![Step by Step Guide on How to Build Forms in a Database [2026]](/blog/content/images/2022/03/form-database-blog.png)